Python을 활용해서 티스토리에 자동으로 글 쓰기


# 1. 오픈 API 설정하기
# 2. 게시글 전송하기
자동 글쓰기 위해서는 access token값이 필요합니다.
* access token값을 위해서는 먼저 open api에 등록을 해야 합니다. (# 1-1)
* 그리고 login한 상태에서 Authentication code 값을 발급 받아야 합니다. (# 1-2)
* 발급 받은 Authentication code을 통해 access token 값을 발급 받아야 합니다. (# 1-3)
각각의 과정은 다음과 같습니다.
# 1-1. Open API 등록
tistory client에 등록하는 과정입니다.
www.tistory.com/guide/api/manage/register
TISTORY
나를 표현하는 블로그를 만들어보세요.
www.tistory.com

이 때 서비스 URL 및 CallBack에 본인의 tistory 주소를 적어줍니다.
등록 후 앱관리를 선택하면
App ID = abcdefg (임의로 적음)
Secret Key = zxcvccc
값을 볼 수 있습니다.
client_id는 App ID 값이 되는 것이고,
client_secret은 Secret Key값이 되는 것입니다.
# 1-2. Authentication code 발급받기
Access Token을 받기 위해서 그 전에 Authentication code를 발급 받아야 합니다.
Authentication code는 tistory에 로그인 된 상태에서만 발급이 가능합니다.
tistory 로그인 후에 인터넷 주소창에
주소창에
https://www.tistory.com/oauth/authorize?client_id=위에서 얻은값&redirect_uri=http://finance.tistory.com&response_type=code&state=someValue
(가령, https://www.tistory.com/oauth/authorize?client_id=abcdefg&redirect_uri=http://finance.tistory.com&response_type=code&state=someValue
)
을 넣고 엔터를 치면
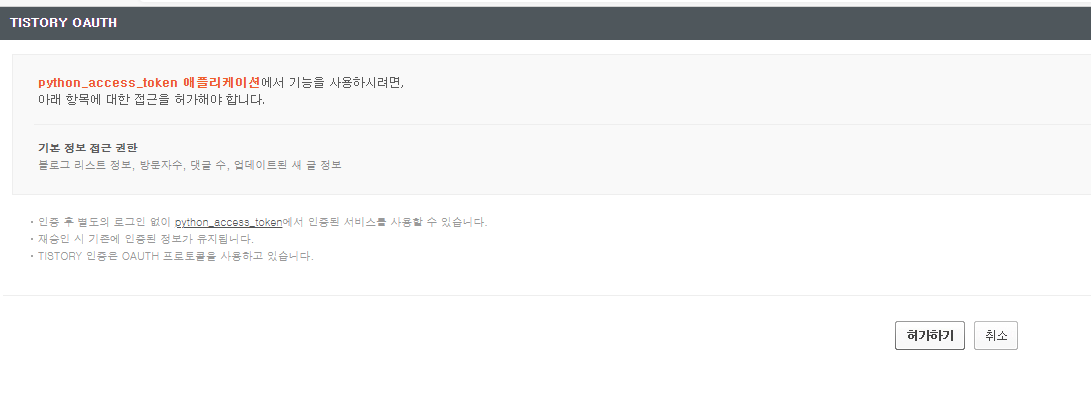
와 같은 화면이 뜹니다. 이 때 허가하기를 눌러주면...
https://finance.tistory.com/?code=abc1234&state=
와 같은 창의 주소가 뜹니다.
이 때 abc1234가 code 값이 됩니다.
code 값은 1시간 동안 유효합니다.
# 1-3. Access Token 발급받기
Access Token을 받기 위해서 그 전에 Authentication code를 발급 받아야 합니다.
import requests


client_id = "위에서 받은 값"
seckey = "위에서 받은 값"
callback_url = "http://finance.tistory.com"  # 등록시 입력 값
code = "위에서 받은 값"

token_url="https://www.tistory.com/oauth/access_token?client_id={0}&client_secret={1}&redirect_uri={2}&code={3}&grant_type=authorization_code".format(client_id, seckey, callback_url, code)
res = requests.get(token_url)
access_token = res.text.split("=")[1]
print(access_token)
# 2. 글 게시하기
import requests
import json


url_post = "https://www.tistory.com/apis/post/write"

access_token = '위에서 생성한 access token을 입력하세요'
blog_name = "http://finance.tistory.com"
blog_name ="finance.tistory.com"
title = "오늘의 뉴스"
content = "작성할 내용 포함"
visibility = 0  #(0: 비공개 - 기본값, 1: 보호, 3: 발행)
category = 0  # 본인 블로그의 카테고리 id를 확인하세요.
publish_time = ''
slogan = ''
tag = '경제,뉴스'
acceptComment = 1  # 댓글허용
password = ''  # 보호글 비밀번호

headers = {'Content-Type': 'application/json; charset=utf-8'}
params = {
    'access_token': access_token,
    'output': 'json',
    'blogName': blog_name,
    'title': title,
    'content': content,
    'visibility': visibility,
    'category': category,
    'published': publish_time,
    'slogan': slogan,
    'tag': tag,
    'acceptComment': acceptComment,
    'password': password
}
data = json.dumps(params)

rw = requests.post(url_post, headers=headers, data=data)
if rw.status_code == 200:
    print('ok')
else:
    print('fail')
# 기타. 오픈 API 가이드
tistory.github.io/document-tistory-apis/
소개 · GitBook
No results matching ""
tistory.github.io